Some pictures are of a different towel due to the fact that I had to be at their party in 4 hours and I had to make two! Yes, it was for twins. They are too cute and love Mickey Mouse. This was the best material our store had and it was cute for Hawaii to have a surfer Mickey. The other two choices were more for quilts.
Gather all the things you need. One yard of material can make two towels. If I am making one I get a yard anyway. It gives you more material to work on fitting the material design nicely onto the towel.
List:
1-towel
1-yard of material
1-hand towel same color as towel or 2-washcloths
cloth scissors or rolling cutters
pins
straight edge ruler
cutting mat
good eyeballing skills ;)
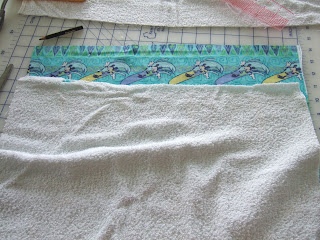
I started this towel with the straight edging. You can make it as thin or thick as you like. The picture below is the thin one and the above is thicker. It may also depend on your material picture.
Make sure to cute the width of the towel and 1/2 inch more on each side. The half inch is to tuck under making the nice edges as shown in the above picture. I like the extra so that when sewing I am guaranteed to catch the material since I can't see the bottom side. I pin all around in a clockwise rotation. Then you don't have to stop sewing due to the position of the pins.
I like to use the narrow band for girls and this wide one for boys. This towel was my first time making it wider and I liked it.
Don't forget to make sure they are even when towel is folded in half before sewing the second side. Also make sure you pinned it to the nice side. Trust me, in my rush I have done this thinking I was taking a short cut.
On to the hoody.
I cut as demonstrated from this site.
Or you can just cut the hand towel in half. Some towels may not be big enough so I use the measurements just in case. Also I try to keep a nice edge that will make it easier to attach to towel.
Also cut the fabric to size. I like to add a little extra material so that I can hide the stitches from sewing the towel on.
I like my hoods with a curve at the back. Put right sides together and sew the top closed remembering to curve at the end. Use a pen to mark both the towel and the material.
Put the material hood and the towel hood right sides together. Pin.
Sew together and turn right sides out. Keeping an allowance of about a 1/4 in at the bottom for later installation to the towel.
Notice the nice edge at the bottom of the towel hood.
Pin together the edge to sew.
Sew edge so that the towel does not separate after washes and use. Learned this from experience. It makes it more user friendly. :)
And gives it a nice edge.
And there you have your hood. If anyone noticed, make sure your material design is right side up. My picture is upside down. The second towel came out the correct way.
Align hood in the middle and pin only the towel hood to the towel inside. Matching the 1/4 inch spacing to the towel. It will help to seal it up nicely when sewing.
I inserted the middle in. Pin and sew. The bottom of the hood is a nice edge and therefore I can just sew it. The towel is less thick in that section.
Here are some clips on the sewing from the inside view.
The corner is secured down. The overlap is the 1/4 inch gap left when sewing the material hood and towel hood together.
Turnover and pin the material hood down. Tucking under nicely enough to sew following the sewing on the hood.
Try not to tug too much or the material will pull on the towel inside.
I stitched close to the edge on this towel. But you can follow the edging width from the hood stitch if you tucked in enough material.
I did the opposite with the towel below. I sewed the material hood onto the towel first and then the towel hood after. You can kind of see the sewing line. Either way is nice.
And there you have your hooded towel.
This was my first tutorial. Constructive criticism would be helpful, but be kind. :)
This was my first tutorial. Constructive criticism would be helpful, but be kind. :)


