Monday, December 27, 2010

Fruits of Labor

After all the hard work I finally get to enjoy the fruits of my labor.

After battling cold after cold since the beginning of December I finally am here.  My children and I have all gotten the cold twice.  My daughter is on her second round while my son and I are finishing our second round.  Thankfully, my husband has not gotten it.....yet?

So my first day of some energy, this is what I decided to do.
Remember my garden.  I planted this sweet potato.  It grew like crazy.

Here it is in the corner.  I planted purple sweet potato's next to it and look how it has grown.

 Another pic.  The purple ones are thriving but the green leaved ones are going crazy.

So picture this with ten times more lush.  So today was the last day to have my niece and nephews.  So I decided to pull out potato's and see what we find.  They had fun.

 This is the original potato I used.  I put it half in water with miracle grow until it started to grow roots.  Then I planted it in a pot after which I planted in the ground.

 After digging around, I could have filled four more buckets of dirt.  I am sure I have missed some and will go look for more tomorrow.

 On the process I found this huge worm.  Did I mention HUGE!  Totally grose.

 Found this many potato's.  Did not bother to count them.

 In the year I have successfully started an avocado plant.

 After three tries, finally have a thriving papaya plant.  I may finally take to my Tutu for New Year's.

 And transplanted two more tomato plants.

It has been a great year for gardening and look forward to next year.  I will start new eggplants and work on perfecting my tomato gardening skills.  I have killed one plant already.  Let's not talk about it.

Christmas Cards and stockings

Here is my little Christmas blurb since Christmas has come and gone and I was too sick to post about it.  But it does not mean I did nothing!

With nieces and nephews and kids of my own, our house was full of people and lots of stuff going on.

First is my families Christmas cards that I made and we sent them out.  (Still have two more to send, I ran out of postage, you are still loved!)

 So I chose the snow globe design from the doodle charms Cricut cartridge.  Now for our picture.  We have yet to take them.  So when the snow fell onto Mauna Kea and Mauna Loa, I had to drive my family up the saddle and take as many pictures as we could.  We basically had to race the clouds to catch the best pics.  And it was great fun.  Thanks to my sis for taking the adventure with us and snapping all the pics.  I also took them on a small hike in which we used one of the pics from.


Pictures all chosen and ordered to size.  My snow globe was ready and I proceeded to glue.  One side first and then exacto knife the edges off.  This started to hurt.  So I found the craft scissors I got a while back and that worked great.  After the first side was finished I glues on the second side and after it dried I cut the edges of it and voila!


Our cute Christmas card.  I had my sister design the writing for the bottom.  Which of course consisted of our names and "Mele Kalikimaka a me Hau'oli Makahiki Hou!"

MERRY CHRISTMAS!

Ok, next project.  We made stockings for the kids cause they forgot them in Oahu.  So if I make for my niece and nephews I have to make for my kids too, right!?  So bring out the scrap material.   My Mom made the pattern and my sister, Mom Andrea, cut out the material.  After the kids each picked their own material.  All the more fun for them.  Then onto the sewing machine I went.


After I finished they got to pick the ribbon to accent the stocking.  They totally loved it.  I would like to say they loved it more then the goodies Santa put inside.  :)  But that's just my opinion.  The green one was two different material so I folded the top so that you can see it.  Cute aren't they.  :)

Thursday, December 9, 2010

Christmas Ornaments

 Here is what I have been up to.  My messy corner of Christmas gifts that I have been working on.

You can see in the upper part of this pic I was making glass ornaments with glitter glue.  I tried the drip ornament and this glue.  Tip: Hawaii is too humid.  I started these in October!  They are still not dry.  That is why the green and blue have dark spots that are dry and lighter spots that are not.  I even put them in front of the fan, ALL DAY!  Ugh! Moving on...

So instead I had these glitter balls I purchased on sale last Christmas.  So these are what I made instead.

Then I made little covers for them or tags with scrap paper I had and could not throw away.

See the ornament inside.  :)
Did I mention I used my cricut to put the year on them.  Having so much fun.  I will post my lanterns next that I made for my niece, nephews and my kids.

Tuesday, November 30, 2010

Family Home Evening

I have seen many versions of the Family Home Evening board assignment and love them all.  So when I went to Ben Franklin and saw they had there boards on sale, I just had to get started on mine.


While cleaning out the shed I went through my mothers old craft box and found some washers.  She had no future use for them so she said I could have it.  Great!  Sprayed those black and sealed them.


Got a pack of hokes from home depot.  They were a pack of six.  Perfect!  Sprayed those black as well.


Designed my board.  Wood glue, modge podge and hung on the wall.  Love it!

Redone Bulletin Board


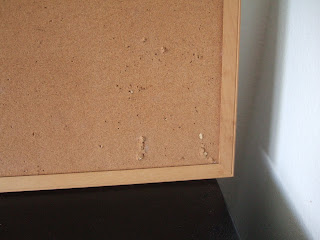
I have had this bulletin board since I was in Elementary school. 


 It has had it's share of beating.  So I decided it was time to convert it into something nice.  So I cleared it of it's clutter and prettied it up.


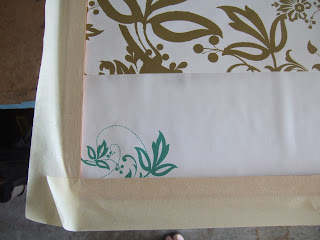
I selected some paper from the bunch that I have and took my spray glue.  I taped the frame so the glue would not get on it.

The sprayed away and placed my paper on it.


This is how it came out.  Now on to paint the frame and seal it.


I can't decide if I like it's natural color or what.  For now it hangs like this, minus the tape, until I decide.

Lady Bug Box


This is what my mailbox has looked like for far too long.  So thankful that my mail-lady knows my address.  So I decided it was time for a make-over.  I had made the lady bug box and my sister loved it and suggested this as the new design for the mailbox.


So I cleaned it and primed it and started painting it.


This was the first dot I made with just the spray paint.  Not so pretty.  So I made a guide for the rest of the spots.


So I finished the spots and added red reflectors.  I also cut out the numbers with my cricut and black vinyl.

Looks much better! Right!

Sunday, November 21, 2010

New Banner!

Don't you just love my new banner!  My brother in law made it for me and I totally love it.  Can you find my kids.  It is cool.

I have more posts to come.  I am working on many projects right now.  Like fixing the mailbox, bulletin board, wooden crate, Christmas ornaments, and more baby gifts.  What more can I say, Craft On!

Monday, November 1, 2010

Letters!

 My daughter is 3 and I have been trying to teach her the alphabets.  Unsuccessfully I was teaching her the sound each letter makes.  But I was given a Letter Factory DVD and she picked it up so fast.  My mother is a teacher and stands by the Hooked on Phonics way of teaching children so this video was perfect.


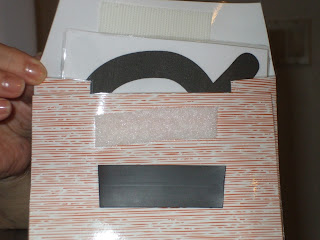
Now I am trying to teach her to read three letter words.  Using the sounds she knows.  She is picking it up great, but I have these letters in a pile.  So I made an envelope for them and laminated it for durability.  I hope to use this for my son also.   I used double stick tape to close it up and Velcro for the opening.


Make sure all your letters fit in them with extra space when making the envelope.  It will be easier to remove the letters that way.  I also added a magnet so that I can put it on the fridge or file cabinet.


She loves it and can read Hat, Rat, Sat, Duck (I know I said, "Three letter words."), Sit, Cat, and Hot.  We call these our letter mouse because we hide a mouse behind the letters and play a game.

I am working on a "Word Worm" next.  Pictures help and after she reads the word we make she gets to find the picture to match.

Friday, October 22, 2010

Arachnophobia...


Personally I hate spiders.  Small, Medium, Big, they are all the same to me.  But I saw this and had to try it.  


So here is my effort.  I had one last Styrofoam ball and a pack of spiders from Wal-Mart and voila, my spiders are hatching.

Halloween window decor.

By far my most favorite decoration I have done this year is this window decoration.  I got the idea from this site.  I was looking at images and came across their image of the pumpkin window.


Check them out here.

I used an old cardboard box.  It was a bit small for my window, but does the trick.
As far as the design goes, it is from a memory as a child.  My Uncle carved us a pumpkin one year and he made it so cool and fancy.  His said Happy Halloween.  So I decided to add the word Halloween in the smile instead of teeth.  It was great fun.  We are thinking of doing another for the other front window.

Wednesday, October 20, 2010

Wreath!

I have seen so many people make these Halloween wreaths.  No one here does wreaths except for Christmas.  Who ever heard of a Halloween wreath.  Well, now that I have, I wanted to try it out.  They are so fun and I have seen cute ones, pretty ones, and scary ones.  So here is my hand at one.
 I had extra eyes that I made from egg cartons.  This picture does not have the red lines on them yet.
 So I took an old rafia wreath that I used once and redecorated it with black tissue (That I had and did not know what to do with black! Till now.) and the eyes.  I had some left over Styrofoam balls and made them into ghosts.  I also made a cat with my cricket and came out with this wreath.
Everyday my family has come home to new decorations around the house.  My daughter loves it.

Monday, October 18, 2010

Happy Halloween!

 Here is my crafty Mom's creation.  She is making these for our visiting sisters.  I even thought she should make them out of baby food jars and then she could add some goodies inside.
The smaller witch is made out of egg carton which was suggested from this site.  But it was too small for her liking so she made the bigger one out of Styrofoam balls that I had lying around.  They were about    >  She was having so much fun (all of her creations are not in picture) she had to try and make a pumpkin.  My only contribution to her creations is the pumpkin stem.  :)  Craft on!

T-shirt Dress


Lately I have been into sewing a lot.  I had extra Lightning McQueen material from making a pillow case for my nephew.  My daughter saw it and wanted it.  So I made her a dress.  I got a cheap shirt from Wal-Mart and sewed a skirt at the bottom.  She absolutely loves it and always wants to wear it.  Easy and fast to sew.

Thursday, October 14, 2010

Boo!

 Halloween is coming and I have been crazy busy trying to scrap together costumes for my entire family.  We are planning on being the Incredible's.  My daughter loves to play Violet.  My husband loves to pass out candy to all the kids and I love to craft.  So I have been seeing lots of everyone's Halloween crafts and have started some.  Here are my eyes.  I also made a sign saying "BOO".

 I am not sure where I want to place the eyes on the board, but the other eyes will be around it in the yard.
I had been saving some egg cartons to make good buddy burners with sawdust and wax in them.  But I thought I could spare some to make these eyes.  I would suggest to cut around them better so that they look more round like eyes.  Thanks to my sister for that critique.  I left a little tab in the middle to help mount it.  I did not paint it till I mounted it.  I paint it whatever color it is mounted on.  So for this picture I would paint it black.

Update:
Here's where I put it.
In my aloe plant near the front door.  I was going to trim it while working in the garden.  But then I saw a perfect place to put my "eyes" and decided this wild and crazy bush was perfect.  So trimming will have to wait till after Halloween.